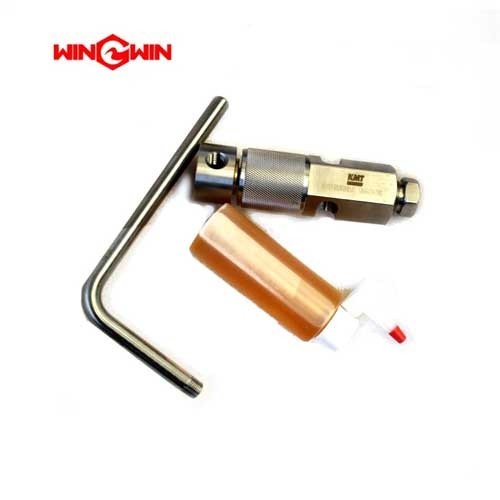
05108857 Hand Coning Tool Assembly, .38
Product Name: Hand Coning Tool Assembly (3/8″) – Part No. 05108857
Description:
This component is a manual hand coning tool assembly specifically designed for preparing 3/8 inch (0.38) high-pressure stainless steel tubing ends in waterjet cutting systems . According to the official parts diagram for High Pressure Coning Tools (Table 12-36), this assembly is listed as Item 2 for the .38 (3/8 inch) size .
The hand coning tool functions as a precision mechanical device that machines the critical 60-degree cone seat onto the end of 3/8 inch high-pressure tubing . The included angle of the cone is approximately 57 to 59 degrees. This cone surface is essential for creating a leak-free, metal-to-metal seal when the tube is assembled with a standard high-pressure gland nut and coned insert. High-pressure tubing must be both coned and threaded prior to installation.
The tool features a collet system that maintains perfect concentricity between the tube and the cutting blade, ensuring accurate and repeatable cone geometry . This hand-operated version provides greater control and is ideal for field service and maintenance applications where power tools may not be available.
Applications:
Cutting the 60-degree cone seat on 3/8 inch high-pressure tubing ends for waterjet systems
Essential for fabricating custom-length high-pressure lines and maintaining the fluid system of a waterjet cutting machine
Suitable for preparing tubing for systems operating at pressures up to 60,000 psi (4,137 bar) and higher
Ideal for field service, maintenance, and workshop environments
Compatible with KMT, AccuStream, Flow, OMAX, BFT, WSI, and other standard waterjet systems
Features:
Precision Collet System: Maintains perfect concentricity between the tube and cutting blade, ensuring accurate and repeatable cone geometry
Replaceable Blade Design: The cutting blade is a consumable component that can be replaced when dull, extending the life of the tool
Manual Operation: Hand-powered design provides greater control compared to power tools, ideal for field service and precise work
Durable Construction: Made from hardened tool steel components designed to withstand repeated use on work-hardened stainless steel tubing
Interchangeable Components: Cutter and collet can be interchanged to permit changing from one size tubing to another
Access Window: Allows for easy application of lubricants and cleaning out of metal chips during operation
Maintenance:
Usage Guidelines:
Proper Setup: Place the body of the coning tool in a vise with soft jaws, allowing adequate clearance for rotation of the cutter handle. Position the tool so the handle is elevated slightly to allow lubricant to flow to the cutting blade
Tube Preparation: Cut tubing to the proper length, allowing extra length for engagement into the connection. For 3/8" HP tubing, the engagement allowance is 0.68 inches (17.3 mm) . Deburr the ends of the tubing before starting
Positioning: Turn the feed nut counter-clockwise to retract the cutting blade past the access window. Loosen the gland nut and insert tubing through the collet until the end is even with the access window, but should not contact the cutting blade
Secure the Tube: Tighten the clamp nut only enough so that it slightly grips the tubing. Give the feed nut a 1/4 counter-clockwise turn to keep the blade away from the tubing, then fully tighten the clamp nut with a wrench
Use Cutting Oil (Critical): Apply a liberal amount of medium-weight cutting oil with high sulfur content to the exposed end of the tubing, the cutting blade, and through the lubrication channel at the handle. Apply lubricant frequently and liberally throughout the cutting operation
Proper Cutting Technique: Turn the feed nut clockwise until the cutting blade contacts the end of the tubing. In a smooth, continuous motion, turn the handle clockwise while simultaneously turning the feed nut clockwise to establish a constant feed. Do not remove too much material at once; the blade should make light, uninterrupted cuts
Chip Removal: Before interrupting the cut, back the cutting blade away from the tubing. Use compressed air or a small brush to remove accumulated chips from the blade and tubing throughout the operation
Completion: Continue operation until the blade begins to cut the land area at the base of the cone. Turn the handle several more rotations to face-off the end of the cone
Inspection & Care:
Clean After Use: Clean machining chips from the blade and collet before coning the next tube. Thoroughly clean the entire tool assembly after each use to prevent rust and maintain precision
Inspect Blade for Wear: Regularly inspect the cutting edges of the blade. If the blade requires excessive force, produces a rough surface finish, or fails to cut a complete 360-degree cone, replace it immediately
Blade Replacement: When the blade becomes dull, replace it with a new OEM blade (P/N 05108824) . Do not attempt to sharpen the blade, as this can alter its critical geometry and lead to improper cone angles and potential high-pressure leaks
Check Collet and Nut: Inspect the collet and gland nut for wear or damage. A worn collet will not hold the tubing securely, resulting in off-center cones
Storage: Store the complete tool set in a clean, dry, protective case to prevent damage to precision components
Full Depressurization (Critical): This tool is for preparing new or replacement tubing offline. Never use it on a pressurized system. Always follow lockout/tagout procedures and ensure the waterjet system is fully depressurized before any maintenance
Cross-Reference Information:
OEM Part Number: 05108857
Table Reference: Table 12-36, High Pressure Coning Tools (Item 2)
Size: .38 (3/8 inch)
Also available in sizes: .25 (1/4″) and .56 (9/16″)
Compatible with: KMT, AccuStream, Flow, OMAX, BFT, WSI, and other standard waterjet systems